Awesome Alcohol Ink Tutorial
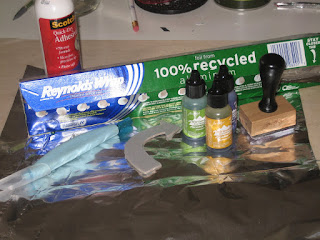
Ever since I learned about Ranger's Andirondack Alcohol Inks by Tim Holtz, I have been searching for more ways to incorporate the technique into my layouts. It's a bit challenging because they have to be used on glossy paper--which is hard to find and expensive. So, I developed this technique to cover chipboard with foil and I use it a ton! You'll need regular foil, a chipboard piece you'd like to cover, glue or adhesive you like, Tim Holtz Alcohol Inks and Blending Solution by Ranger and the blending tool with felt pad, a craft knife and cutting mat (mine is glass), and ink for the edges.
First, dot the alcohol ink and blending solution onto the felt pad of the blending tool. I used Stream, Eggplant, and Meadow.

Dab the blending tool all over the foil. You get different results every time you dab, so keep going until you like the resulting look of the alcohol inks on the foil.

Turn the foil over so the ink is on the underside. Put adhesive on the FACE of the chipboard (not the back). I like to brush the glue over the surface, but you can also use spray glue, glue stick, tape runner.

Glue the FRONT of the chipboard to the BACK of the foil so that the alcohol inked part of the foil is now attached to the chipboard. Then use your craft knife to cut the foil around the chipboard. Make sure it's very sharp or you will rip the foil. Now the face of your chipboard will be covered with alcohol inked foil.

After you cut out the chipboard piece, flip it over and clean up the edges by gently using your thumb to fold any foil edges sticking out over the side of the chipboard piece.

Ink the edges with a matching color (or use the leftover ink from the pad to do the edges).

Here is what your final chipboard piece looks like!

I've used this technique on chipboard letters, shapes, embellies, etc. Here are a few examples of this technique on a layout.


On the last "L," I used the end of a small paintbrush to dent in the foil-covered chipboard while the glue was still wet--it gave it a hammered metal look! Good luck with this technique and I hope you'll feel inspired to use alcohol inks more on your layouts!
Cindy "Scrappy V"


This is a great idea using foil. Will try it.
ReplyDeleteVery neat! I love it!
ReplyDeleteThis looks fantastic, I'm going to have to try it, TFS, Cathy x
ReplyDeleteA wonderful concept. Thank you.
ReplyDeletehow do you seal it so it doesn't come off?
ReplyDeleteDo you seal the foil after it is complete. What do you attach it to.
ReplyDeleteShirley